Hoaba Datschi - Bavarian Blueberry Cake

Hoaba Datschi (here with blueberries and raspberries)

The Hoaba Datschi is a Bavarian desert. You could translate it into German as "Heidelbeer-Auflauf" which doesn't sounds even half as original (urig), and don't think of it as a "Blueberry Casserole". Its' a Hoaba Datschi.

I was invited to a girls evening at my friends house. She planned on serving Bavarian food and asked me if I could bring a desert. So I googled "bayrische Suessspeisen" and decided on that yummy looking desert which I found via the blog Die Landfrau.

"Hoaba" is Bavarian and translates blueberries (which is Blaubeeren or Heidelbeeren in high German language). But what is a "Datschi"? It's a Southern German word, and stands for the cake (although there are many different recipes for a "Datschi", most famous is the "Zwetschgendatschi", a plum sheet cake). The original meaning might come from the verb "tatschen" (English = to touch) or "hineindatschen" as the fruits are pressed into the dough (in some recipes). In the "Hoaba Datschi" the fruits however sink into a very liquid dough, comparable to a pancake dough.


ingredients:
5 eggs (separated)
200 gr sugar
300 gr flour
350 ml milk
1 pinch of salt
some butter for the mold
500 gr blueberries


how to:
1) pre-heat the oven, add some butter into the mold(s)
2) beat the egg white until stiff
3) mix egg yolk, sugar, flour, salt and milk like a pancake mixture
4) gently fold in the stiff egg white
5) pour the liquid into mold(s) and top it with the blueberries
6) bake it in the oven at 180 degree for 20-25 minutes


tips:
You can use fresh or frozen berries, and you could add raspberries to the blueberries. For serving you could sprinkle a bit of icing sugar. It goes also nicely (when fresh from the oven or warmed up) with vanilla ice cream or whipped cream.


Blueberries added on top
- you can use excess dough to make muffins -

before baking - the berries before sinking

make the wooden stick test after 20 minutes in the oven

Hoaba Datschi with blueberries (Hoaba) and raspberries


to sprinkle with sugar or icing sugar (with or without whipped cream)


Tiroler Nusskuchen - Tirolian Nutcake - and a simple pound cake recipe

 
Tirolian Nutcake

When I was a kid, I helped my mum in the kitchen. My special fields were salad dressings and cakes. Despite being around when she was cooking, I never really developed cooking skills. Beside some dishes I am quiet successful with, I prefer very much baking over cooking. For good reasons: the entire home smells better, the kitchen is less messy, and you enjoy a cake usually over a longer period of time meaning baking is a much more efficient process.

One of my usual cakes for the weekend was among others a plain "pound cake" (Sandkuchen) with lemon icing. That easy and quick cake can be varied and become a "marble cake" (Marmorkuchen) when adding chocolate powder (and icing sugar on top). Or it can become a "birthday cake" when adding chopped nuts and chocolate (and rum raisins for those who like it, together with a chocolate coat). But recently, I found a more elegant variation of the pound cake, a recipe that tops it all: it's the Tirolian Nutcake (Tiroler Nusskuchen).


ingredients:
200 gr butter
200 gr sugar
6 eggs (separate white and yolk)
250 gr almonds (1/2 roughly cut, 1/2 finely ground)
200 gr dark chocolate grated (rasped or finely cut)
125 gr flour
1 teaspoon baking soda
1 teaspoon cinnamon
lemon skin grated


how to:
1) mix well butter, sugar and egg yolk
2) add flour, baking soda and cinnamon
3) add all almonds (fold in with wooden spoon)and lemon skin
4) mix well egg white until stiff (in separate bowl)
5) fold into dough with wooden spoon
6) at the end add the chocolate and fold in slowly
7) bake 1h at 180 degree (don't forget to preheat the oven)


Tips:
Bake the cake a day earlier as it will taste even better the next day(s).
You can also freeze the cake or part which makes it also yummy moistly later.
Instead of making a cake, you can make muffins.
Top the cake or muffins with icing sugar.
If you don't have icing sugar, make some by adding normal sugar in a mixer.


------------------------------------------
 

My basic Pound Cake recipe, easy to remember, easy to vary:

ingredients:
250 gr butter
250 gr sugar
250 gr flour
4 eggs
1 pack of vanilla sugar (teaspoon)
1/2 teaspoon of baking soda
1 spoon of rum

how to:
1) mix butter, entire eggs and sugar well
2) add flour ad baking soda
3) add vanilla sugar and rum
4) bake 1h at 180 degree

Tips:
You can double the ingredients to use the heated oven more efficiently with two cakes, or one cake and muffins. You can freeze part of your bake.
Topping can be simple icing sugar, or lemon icing (lemon zest with icing sugar), or melted chocolate.
For the "marble cake" variation, take 1/3 of the dough in another bowl and add (sieved) dark chocolate powder (up to your taste). Into the cake pan add first one layer white dough, then a layer chocolate dough and the last layer again white dough. Dip with a fork gently up and down through the layers to achieve the marble effect.

Cantuccini - The Recipe

home made cantuccini

home made cantuccini

This is THE Cantuccini Recipe many friends have asked me about. 

Even a famous Italian ristoratore had asked details - which made me already consider to start a new business ...  Maybe a new carrier is waiting ahead? Cantuccini Supplier for Italian restaurants? 

Since it does not seem to happen, I thought to finally reveal the "secret". - But will my home made cantuccini still be appreciated, when everyone can easily (yes, easily, that was my "secret") bake them at home themselves? - Well, I decided to file and share the recipe here on my blog as filing and sharing was always a main purpose of blogging after all. And it helps me to find the recipe easily in case I need to double check.

The recipe is of course from Tuscany (Toscana), but the signora who had thought me how to make them lives in Calabria - in Pizzo to be precise, and that's where I made them the first time, together with her (see photos below).


ingredients:

2 eggs

200 g almonds (with skin, natural, not roasted, not salted)

200 gr flour (00 or 405 type, or same for bread making)

180 gr of sugar (90 gr per egg)

1 pack of vanilla sugar (teaspoon)

1 pinch of salt

The ingredients are for an oven tray of 60cm. The output is about 1/2 kg of cantuccini. If you have a larger oven, of 90 cm, you could just double the ingredients.


how to:

1) preheat the oven to 180 degree (C)

2) mix sugar and egg (long)

3) add (sieved) flour slowly and mix well

4) add almonds and fold in with a wooden spoon

5) cover baking tray with paper, make two strings of dough (see photo below)

6) bake 15 min in oven

7) take the tray out, chop (not cut) the "bread" in finger thick slices 

8) lay chopped cantuccini flat on the tray and bake for another 15 min.


FAQ:

Q: do you need yeast or baking soda?  A: No, no need.

Q: do you use egg white on top for the meringue-effect?  A: No.

Q: how about butter or oil?  A: Nope!


Photos of our "baking class" at Palazzo Pizzo's kitchen in August 2012, with double ingredients for a 90 cm tray:


make two strings of "bread"

make two strings of "bread"


After 15 min of baking take the tray out from the oven and chop cantuccini

After 15 min of baking take the tray out from the oven and chop cantuccini


Lay them on the tray and bake again for 15 min

Lay them on the tray and bake again for 15 min


home made cantuccini

Easy ! Home Made cantuccini


Enjoy home made cantuccini!

Serving tip: Cantuccini can be served for breakfast with cappuccino o espresso café; they can be dipped in the coffee or even be dipped in sweet vino santo after a meal. Your home made bake will make nice little presents when packed in clear bags and wrapped with a ribbon. - Just don't bring them when we are invited to the same party ;-)

Recipe credit: Yolanda Pezzo

Why Blogger is better for bloggers than Wordpress or Squarespace


Once every now and then I try to re-design my blog. And it's about time to have a real website that integrates this blog. Therefore, I did some massive research on the Internet, to find out the advantages and disadvantages between Bloger vs Wordpress vs Squarespace vs Wix vs Weebly and others ... 

The internet offers fantastic information on many tech blogs and youtube - but you need to be careful: Most comparisons between Blogger and Wordpress, or Wordpress and Squarespace are written by great IT experts who often happen to be affiliates of one of these sites - and then it can get biased. Or they claim everything is so complicated because they want to sell their own web development / web design skills.

What you cannot do, is to compare Blogger with Wordpress.org - because it is like comparing apples with oranges! You need to compare Blogger's free service with Wordpress's free-ish service at Wordpress.com (dot com). And then Wordpress(.com) looses and Blogger wins! At least that's what bloggers like me say, with blogs powered by Blogger for many years (me, now almost 8 years), and who know how to easily personalise your blog here at Blogger or BlogSpot, not even much HTML coding is required (but it is allowed).

To learn more about the blogging platform and features of Blogger vs Wordpress, and to be able to make a decision, you should read the most unbiased article I found on the internet by Make Use Of. I totally recommend to read Tim Brookes' post and also to read through the comments as he answeres all the questions of his readers and that might answer your questions too.

My short (2 days) experience with Wordpress allows me to say that freedom feels different. I couldn't believe that they shot down my new page (in the making, not even having content yet!). Although, another 2 days later they appologised for the mistake, and I am free to continue (and was asked to delete my cookies as they detected spam). But does that make me feel confident?

Wordpress(.com) can also shot your blog down when they detect any paid or affiliate links. BUT they are free to place any advertising into your posts! Don't like that? You can pay for an ad-free page. Want some small changes in your design? Pay some bugs extra! Videos? Only if you pay 60 USD per year! A favicon (small logo in the URL)? Costs extra! And pointing your own domain to yourname.wordpress.com page is possible, but you need to pay 13 USD per year (not including the registration)... Calculate, it adds up! That's why I say WordPress is "free-ish", as it is not really free.

In seven years with Blogger I had no single technical issue, and unlimited space for media, including videos, my own favicon and no charge for pointing my personalised domain name to my blog. So why I would think of changing after all?

Well, I wasn't a very active blogger (I never made the three posts per week rule). But although I blog less and less (our mission, the renovation and main content of this blog, is accomplished), I want to keep my little writing playround. And now, our beautiful guest residence requires some internet presence as well. - Before starting all over with a new website, I thought, it would be nice to have a professionally looking welcome page, a static landing page, instead of landing on the latest blog post.

My blog needs a static landingpage! 

I tried to tweak Blogger a bit in order to have a static landing page (and another page called "Blog" would feature the blog posts). I followed these intructions to create a static home page.  It is really simple and worked. The problem that I saw however, was a longer loading time. The redirecting worked fine on the PC and on the tablet, but did not work for the smart phone. The error message was about server cannot be loaded due to too many redirection. Also it did not look that great as your landing page shouldn't have a blogroll. With blogger however you cannot change the template design for single pages. There is one frame for all. And a blog needs a blogroll. Otherwise what is the point of blogging if you cannot engage your readers? 

On the internet there are many rumours that Google would close its blogging platform Blogger one day, as sudden as they closed Google Reader. It would be a pitty as Blogger is really easy to handle and you can make your blog look good with the "simple template" and then play around with the template in the advanced modus, or tweaking around with HTML and CSS - and it is all free! You are not even forced to use Google Adsense.

And then there is Squarespace. They are very, very good in martketing their platform! It seems like a hype (maybe their affiliate program is so attractive). They are already around since 10 years with 1,8 million websites/blogs. - They have a different approach. You need to pay a monthly fee. For that you get access to the web building software with top stylish templates and all seems easy to handle. And you have access to a 24/7 custmer support which is great in the beginning. They seem super nice and let you import your blog from Blogger (and others) and export your website to Wordpress, in case you want to terminate the hosting plan ... sounds fair enough.

Squarespace let you try out their templates 14 days for free and then you need to decide if you want to publish with them. I liked it. Their templates are clean and 'pretty'. Great for photographers and artist who want to show their work in galleries. Or for restaurant owners (there is a plug-in for a menue). BUT the features for a blog are very limited! As a blogger I would not choose this solution. I deem Squarespace is mainly for small businesses that do just a little bit of blogging on the side. There is no Html-CSS-fiddling-DIY-tweaking allowed.

Of coures there are many other platforms beside Blogger, Wordpress and Squarespace. A good overview and comparison can be visited here by the Website Builders. I checked Weebly and Wix as well, but they don't have the same good looking templates / themes as Wordpress or Squarespace, and furthermore they also cost some money for ads-free pages, favicon and domain pointing.

In the meantime, I returned to my blog powered by Blogger and have to say, it still looks okay. (I have now moved the blogroll(s) to the bottom of the layout). All these modern stylish minimalistic pages are maybe not even suitable for my love of the simple life in Southern Italy. And blogger is totally free - so best value!

For now, I will continue with Blogger. And one day I might either have a peaceful deal with Squarespace or my self-hosted website with Wordpress.org (dot org and NOT dot com).

DIY Home Staging for Holiday Rentals - 10+ ideas

Home staging is the art of styling and presenting a property - mainly to improve its appearance for potential buyers. In the U.S., almost an entire professional branch has emerged from 'home staging to sell'. And it works. So why not stage your holiday rental to 'sell' it to vacationer? Take great photos and advertise them online. The first impression counts!

Of course you do not have to hire a professional stager when you have some sense for aesthetics and interior, and are able to handle a camera. It can be as simple as placing a vase with fresh flowers on the table or a bottle of wine and 2 glasses. Although professionals staging can even include a complete redecoration and repaint of the entire home before dressing it up with some magic touch. How much you want or need to invest in your vacation rental to make it look more appealing depends on your budget, the actual condition of your property and the price you will be able to achieve in your area.  

The residence we are letting is over 200 years old. It used to be a storage space for olive oil and hand made soap and only had only an earthy ground and stone walls and ceilings. It was more than a renovation. We made it livable. After insulating walls and laying a floor, we furnished the residence with modern and antique items, and decorated it. We bought some pieces of local art work to hang on the walls. Over time I had taken many photos. Some were nice. But some photos I took just looked lifeless, without a soul.

A good friend of mine told me "'Stage it!". And further elaborated for me (coming from an undeveloped country in that matter), "Put some lemons next to the sink". She had lived long enough in the States knowing 'unstaged' - or even worse - empty property does not sell as people can less envision themselves at home.


"put some lemons next to the sink!"
There is no difference with vacation rentals.

Imagine a yourself planning a romantic get away in the South of Italy, looking at some holiday lettings' websites. What do you see? What does trigger your decision? - Photos and reviews. - And it is all connected. If a place is well decorated, it will not only look good in your visitors' eyes, and possibly lead to positive reviews, you will also be able to take good photos. And even attract more visitors with even better photos after some additional staging. But keep your staging fair and real.

You can stage flowers or fruits and assume guests would not necessarily expect exactly those in a holiday home. But you cannot stage crystal glasses when in reality guests will find plastic glasses in your kitchen. Or a beautiful umbrella in the garden when you don't provide one.

Let's get started. Prepare a camera you are familiar with. It can be set on autofocus, with a standard lens, or even a smartphone. Make sure you get most of the space of a room into the picture, but also take some close up details. Always try different angles and heights. Ideally use some photo editing software or smart phone app afterwards to adjust the lighting of the indoor shots, crop or sharpen if necessary.

And here are some ideas and details for your DIY Holiday Rental Staging:

0. Clean Up
I know, this is so evident, so basic. But it goes beyond the daily routine. Weather you are renting your entire home with private photos and books, or a separate room or residence just for guests, it needs to be perfectly cleaned before a photo shoot. The faucets in the bathroom and kitchen should shine! But there is more. If you rent your private home, you will probably have it already de-cluttered to the max to allow guests to feel comfortable. Your collection of regional pottery will ad charm, your blurred snap shots of your childhood might not.

Cleaned up, all shiny, lemons staged, but don't forget to hide the cleaning utensils when shooting (can you see it?)

1. Decorate with flowers
As said above, staging can be simple. Get fresh flowers from your garden, or single branches from a tree with decorative leaves or blossoms from your street. Otherwise buy them from the local market or flower shop. Try to reflect the flair of the location and the spirit of your home. For a Mediterranean home purple Bougainvillea branches or white Callas are more typical than tulips or orchids.


I bought some beautiful Agapanthus flowers and placed the pots in the garden - they remained of course after the photo shoot.


A bottle of wine, wine glass, cork and flower from the garden - together with a retro lace table clothes from the local market - a beautiful staging! (Next time, I would maybe add part of a chair).
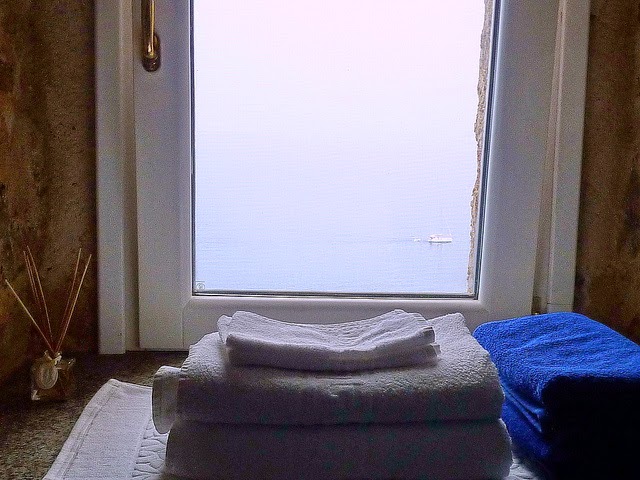
 
2. Bathroom
Did you invest in large and soft towels for your guests? Show them in your photos. Fold the toilet paper like the room maid does in hotels. Close the toilet lid. If you offer shampoo and shower gel or spa style hand soap, show them in your photo. Take pictures, with all lights on, from different angles, then shoot details: fluffy towels with the amenities in the background; your beautiful tiles or a fancy hook. Hang a straw hat on the hook or place it on the window sill.

Not the best image quality - but it shows the guest you put effort in details
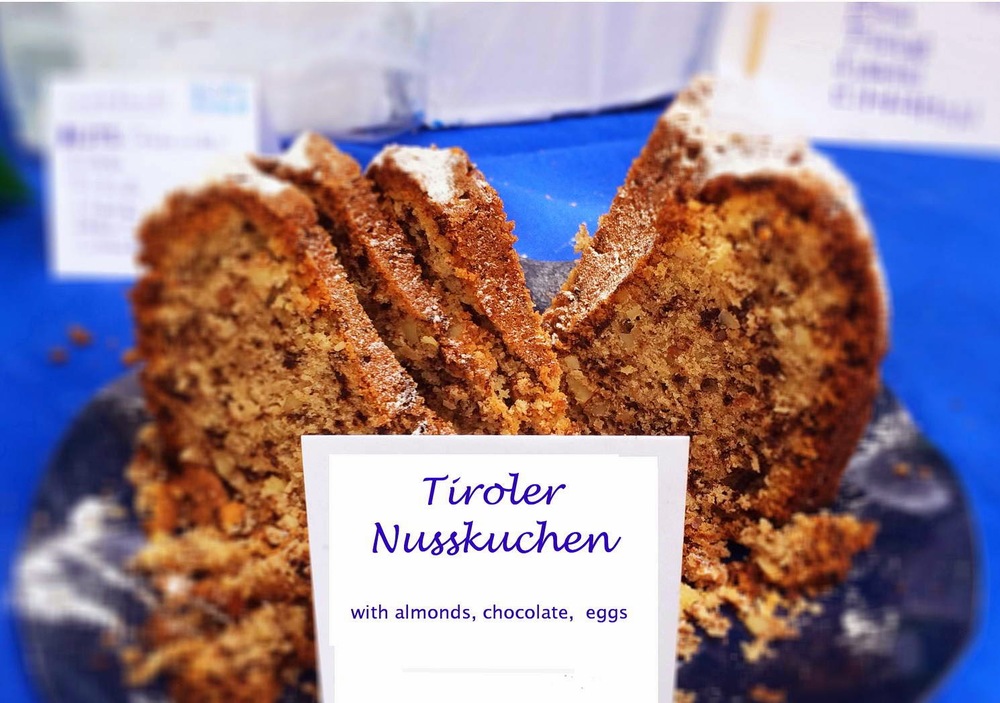
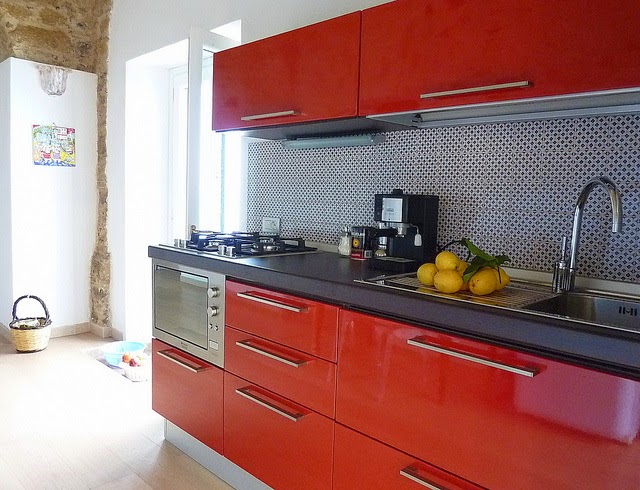
3. Kitchen
"Put some lemons next to the sink" if your vacation rental is in Southern Italy. Or some tomatoes or oranges. Choose a contrast to your kitchen colour. Show details of the coffee machine or fridge, if they are vintage or of any interest.

Choose fruits or veggies to display in the kitchen that stand out with their color, switch lights on if necessary

4. Dining Table
Put all you have to offer on the table. Tablecloths, plates, glasses, cutlery, candles, napkins. Vacationer will envision themselves having lunch or dinner in your place. Take the lunch photo during lunch time and the dinner photo with candles lit on when its dark outside. (You might even notice during your photo shoot that something is missing in your property. Maybe not enough light to see the food on the plate? Or the light bulb is too bright for a romantic atmosphere?). Sometimes two glasses and a bottle of wine are also enough to present, especially when you expect the guest to eat at restaurants.

Add some life to your rental, place fresh fruits in a bowl, a bottle of wine with glasses on the table to help potential visitors to envision themselves in the picture

5. Living Area
Do you provide cushions on the sofa? If not, do provide two or three. If yes, is the cushion cover matching the ambiance? If not, change it. By something local from the weekend market. Then shoot the photo. Decorators suggest to place objects in pairs or in uneven numbers, like one or three. Place three books or magazines on the couch table. (I wouldn't show the TV, for three reasons: 1) it seldom looks attractive, 2) it is enough to mention it on the rental website, it shouldn't be a major activity during holidays, 3) burglars might be interested in electronics.)

6. Bed Room
The bed cover should match the flair of the location (get it from the local market). The bed can be made in two ways: 1) cover all with the bed cover (this is functional) or 2) fold the bed cover back and cover it with the linen and show the pillow with pillow cases (this looks inviting and homey). For the pillow cases you can choose a good quality. Iron it well as wrinkles would show in the photo. Adjust the bed cover and pillows as long until they look in perfect harmony, then shoot. Switch on the bed side table lamps and shoot again. Try different atmospheres, with lights on and out during day light and at night with all lamps on. Take a photo that shows the wardrobe, or part of it (as that is an information for the guest). Place the straw hat (if not yet used for the bathroom) on a chair.

Take photos right before your guests arrive, present the pillows in crisp white bed linens and give it an inviting look.

This detailed photo shows the Madonna del Carmine of the church next to our house. It adds some local spirit, some positive sign - and it shows, we have a night stand and a reading lamp.


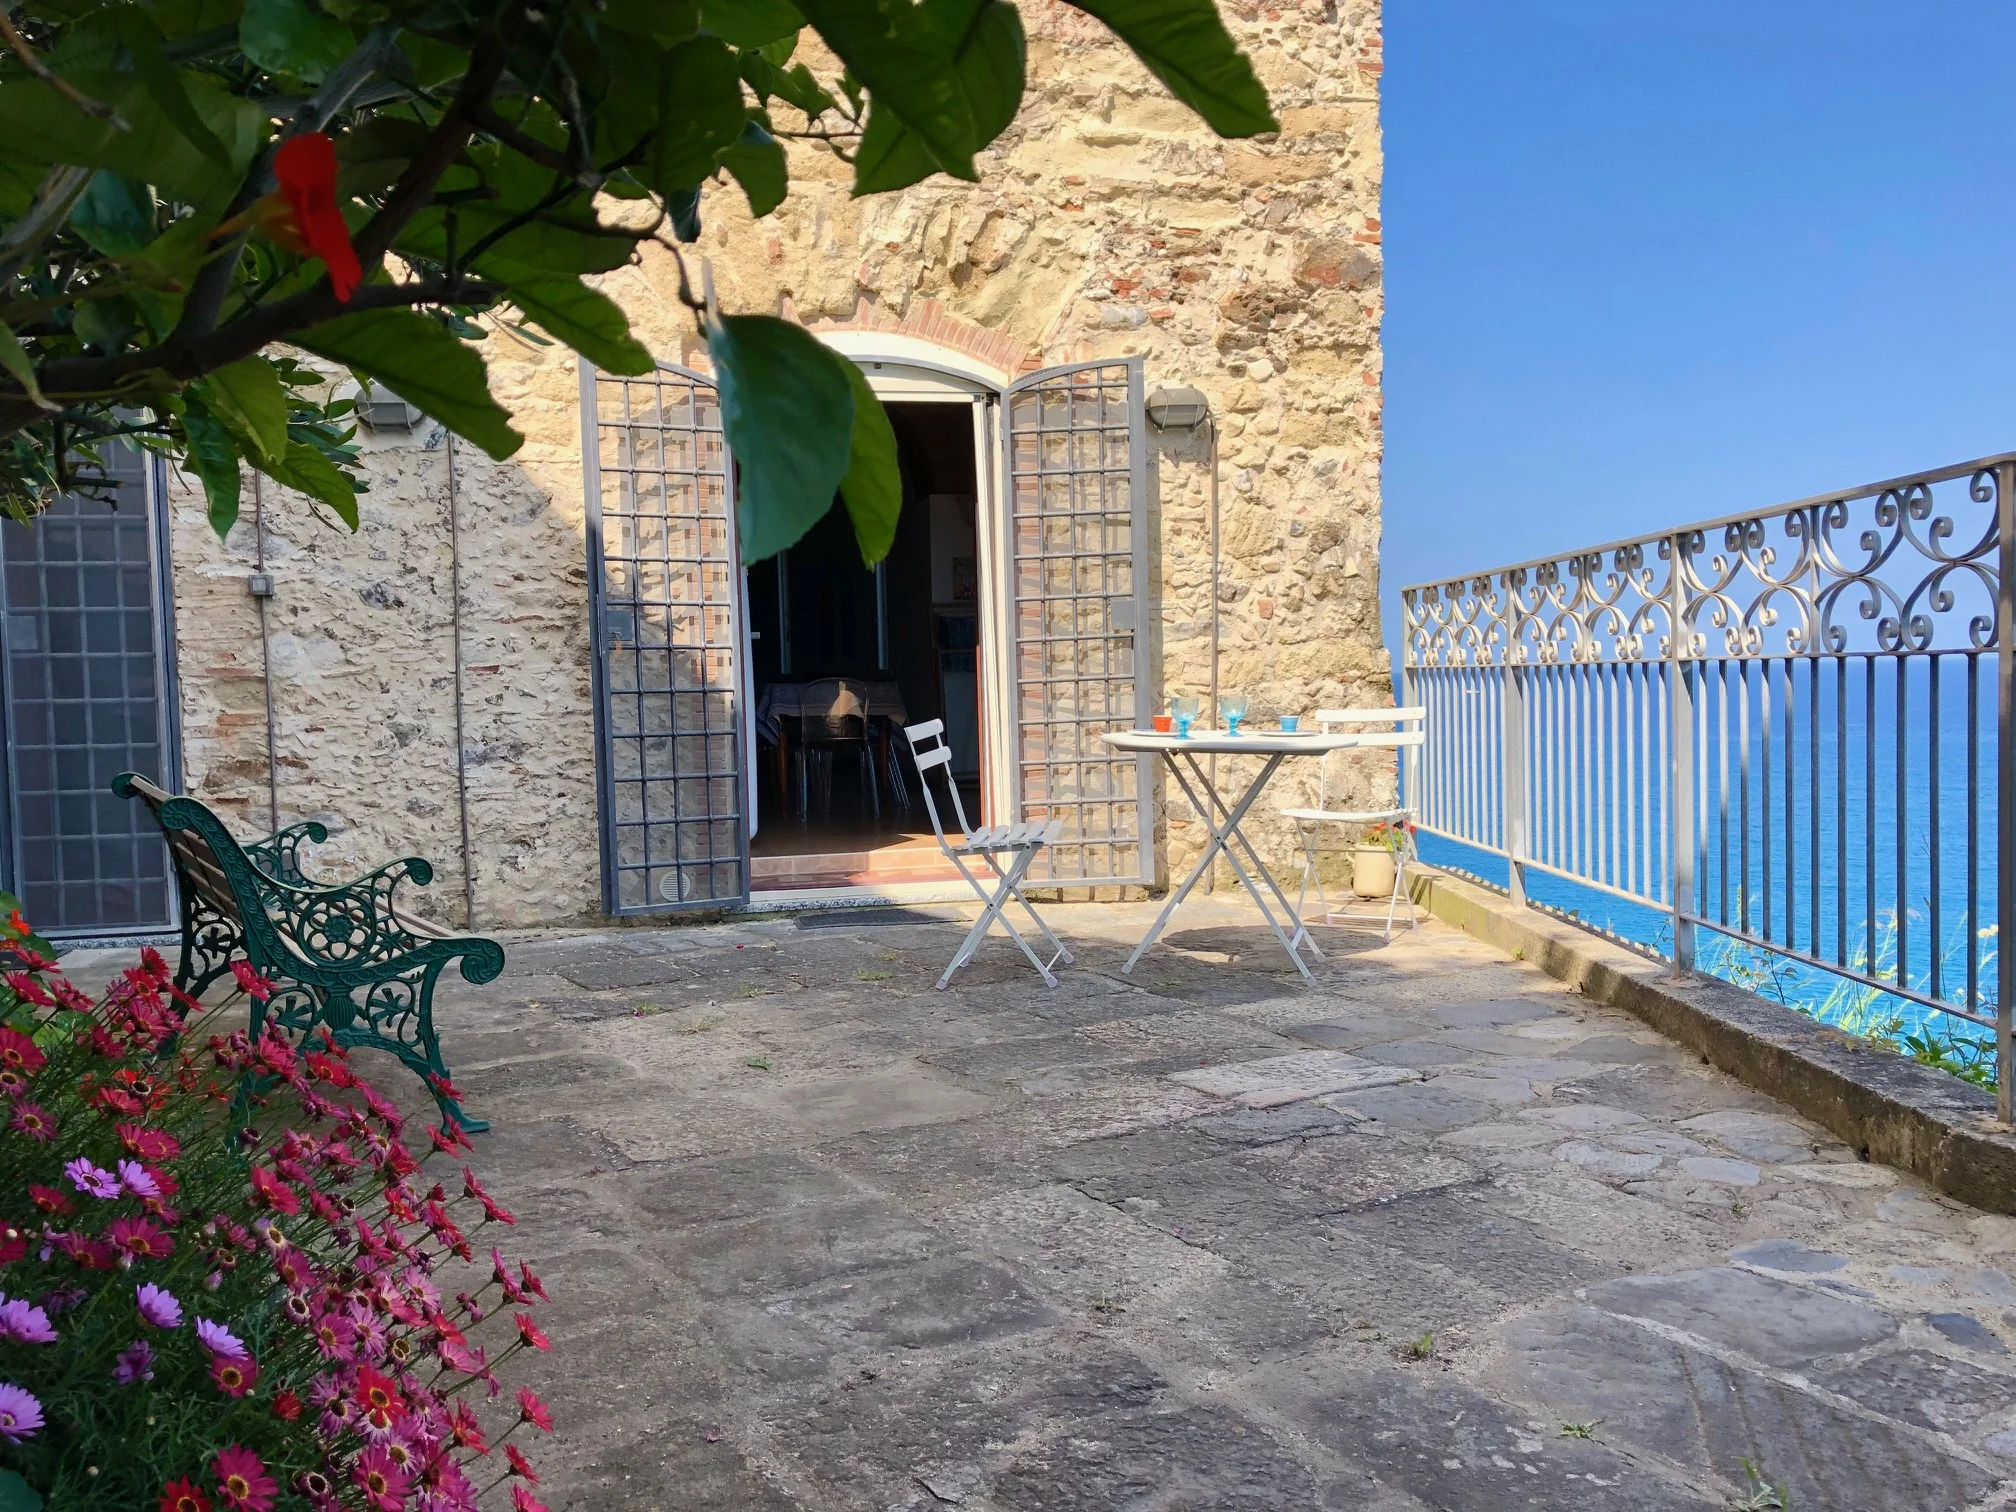
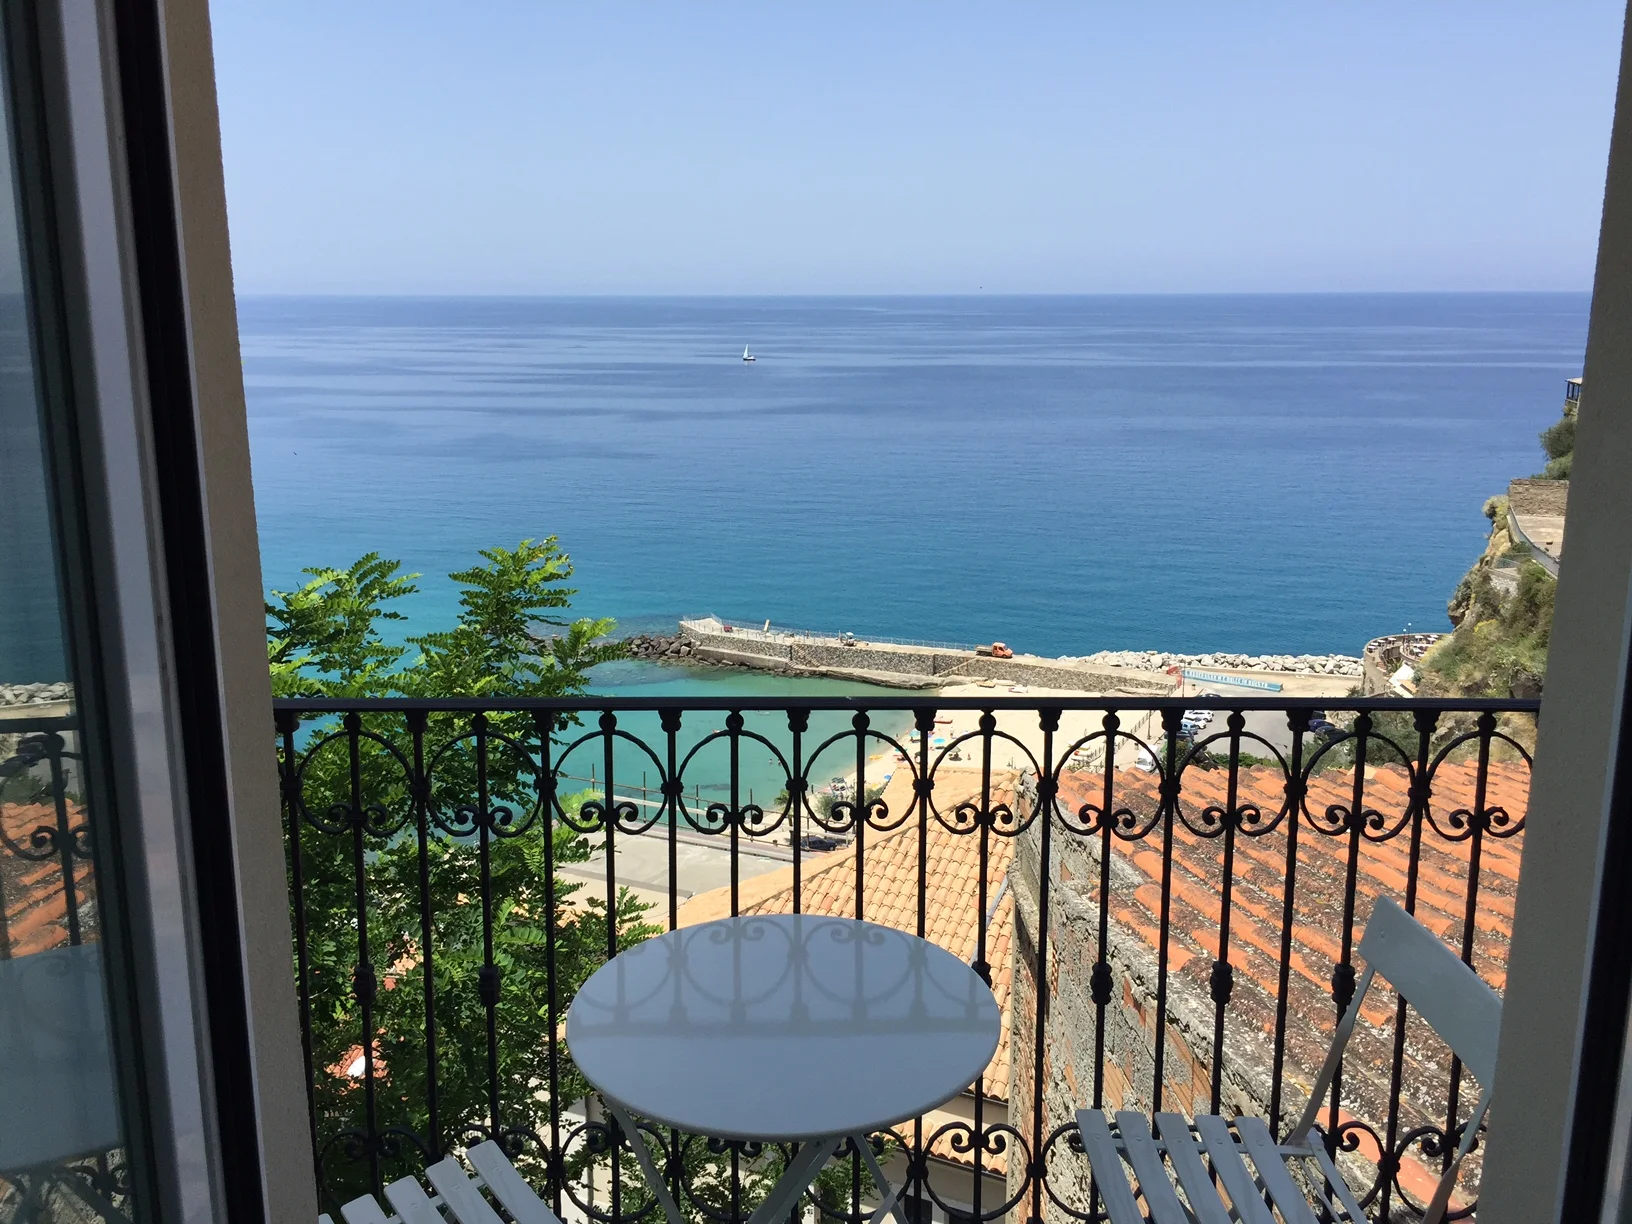
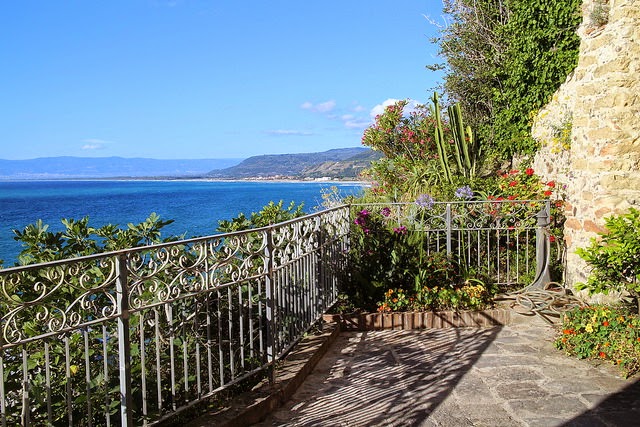
7. Garden, Terrace or Balcony
If the flowers are in full bloom, shoot. If not, get interesting plants in the foreground or part of branches hanging into the photo. Get details from the olive tree or the garden bench. Buy a flower or plant pot from the local market to stage where there is a gab. Create depth in field (with low f-stop for a blurry background - or use a smart phone app like camera +). Get the view, get the view from inside out and from outside in. Find the best perspectives. And place garden table and chairs. Use table cloths. Stage the wine bottle and the glasses. Shoot the deck chair with a book - or a straw hat. If you provide an umbrella, open it and shoot the sun and shadow effects.

One of my usual garden shots: the place is so serene and the view so awesome... that I totally forget the staging!
 
If you have outdoor furniture use them for your photos where and how your guest will!


Another day, and finally some staging, but the sun was gone ... there is always a reason for another staging session

8. Entrance area and stairways
Even if that area is not the most interesting and some websites limit your advertising to 24 photos, you might want to provide the information to potential renters what they expect here. You might need to provide the stairs in a whole. Place a basket or straw beach bag on the stairs.

9. Neighbourhood in front of your door
For vacation home renters, the neighbourhood they will be calling home for some days is also of interest. Take a photo from some detail at your door. The old letter box or bell knob with part of the street. Her again you could add a flower pot, a welcome sign, bicycles (if guests can use or rent them), or your old Vespa for adding some flair.

10. Staging with people
I see very seldom a person in a vacation rental advertising. But why not? Most hotels have people in their ads. If you rent to couples, chose a couple among your friends that is around the age of your target group or your most frequent age group. If you target families, let some kids play on the floor with some toys you provide. If you allow pets, stage with a dog. The people should not look into the camera to keep it neutral and not look like a personal holiday snap shot.


First tryout: I think, a second person (a man) standing on the left side at the railing and watching the see while looking slightly to the right (into the picture) would have been perfect, since our target group are couples.

black and white makes the photo more arty, and suggesting the place has some history
if you have several good shots, you can combine them to a mosaic, and include the people just in one of them
 
After my last photo shoot and while editing and choosing the right pics I already saw what I could do better next time and what I forgot to shoot! Especially after writing this post....  BTW, all the 'deck chair photos' were shot with a smartphone by a recent guest. Thank you so much! I asked them to do me the favor, as I really had forgotten to shoot the new deck chairs! (They were neatly stored inside.)
 

I converted one of the photos into black and white

When I saw the photos with the empty deck chairs, I suggested to place a book. And see what I got:
 
staged with a book
My guest did some staging for me !